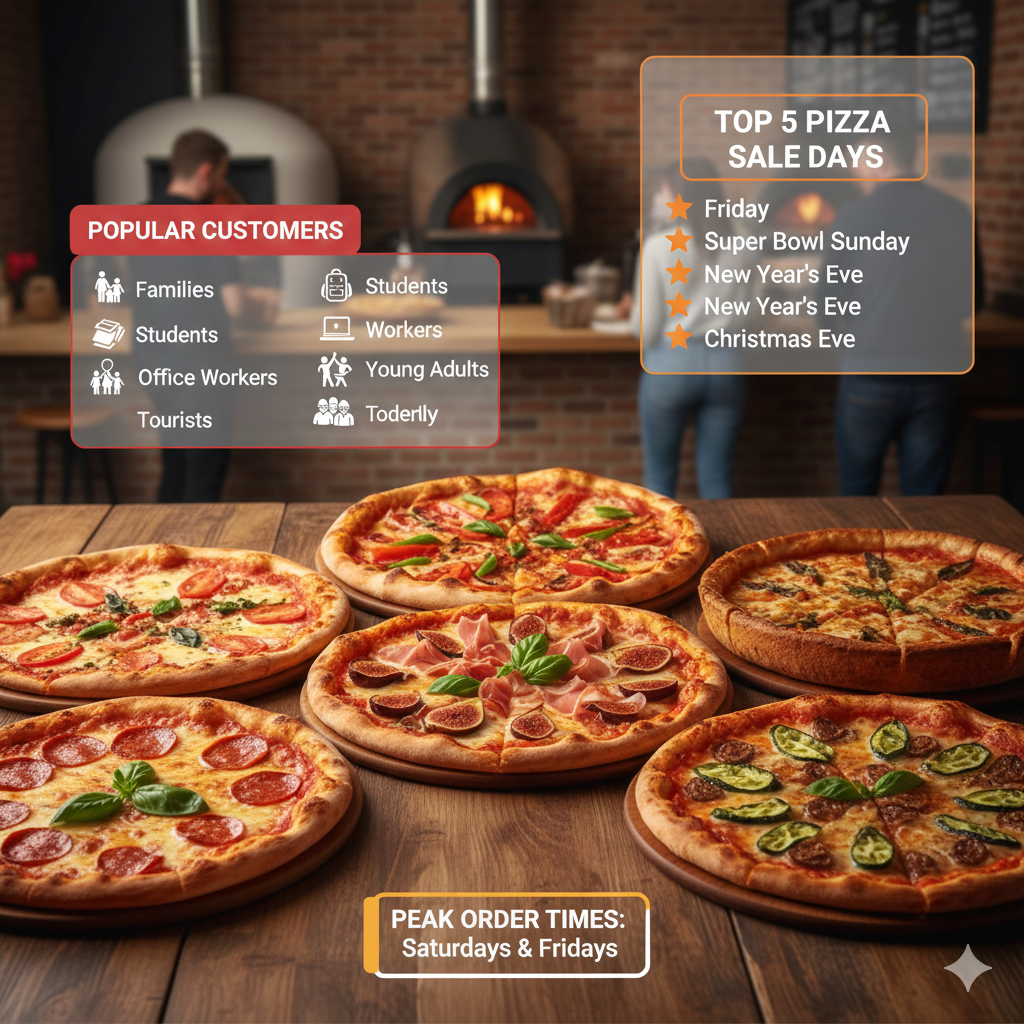
Embroidery digitizing is not simply about running artwork through a software program. It is a deliberate and highly skilled process where every stitch placed influences the look, durability, and overall quality of the finished design. At the heart of embroidery digitizing lies one critical decision: choosing the right stitch type. Each stitch type behaves differently on fabric, interacts with threads uniquely, and creates specific textures. When you understand the major stitch types and how to apply them, you elevate a basic design into a professional, eye-catching piece of embroidery.
What Is Digitizing in Embroidery?
Digitizing is the process of converting a digital image into a file that embroidery machines can interpret. A digitizer determines stitch placement, stitch direction, density, and pathing. Unlike simple graphic editing, embroidery digitizing requires a technical understanding of how stitches behave on fabric, how tension affects threads, and how different stitch types complement one another. Choosing the wrong stitch type can cause issues like thread breaks, uneven coverage, or puckering of fabric. Choosing the right one, on the other hand, ensures that designs remain sharp, legible, and long-lasting even after multiple washes.
The Three Primary Stitch Types in Embroidery Digitizing
The backbone of digitize for embroidery rests on three major stitch types: run stitches, satin stitches, and fill stitches. Each plays a specific role and is chosen depending on the size, shape, and purpose of the design.
Run Stitches (Walking Stitches)
Run stitches are formed by placing one stitch after another in a straight or curved path. They are the simplest type yet incredibly versatile. Run stitches are commonly used to outline shapes, add fine details, or connect different sections of a design. They are also employed as underlay stitches that stabilize fabric before denser stitches are added. When digitizing with run stitches, stitch length must be carefully adjusted. Very short stitches can cause thread buildup and puckering, while overly long stitches risk snagging on clothing or unraveling. When used properly, run stitches add precision, clarity, and structure to embroidery.
Satin Stitches (Column Stitches)
Satin stitches are long, smooth stitches that span back and forth across a narrow shape. They create a glossy, slightly raised effect that reflects light beautifully, making them ideal for lettering, monograms, borders, and small decorative shapes. Satin stitches work best on areas no wider than about 7–8 millimeters. Anything wider risks looping, snagging, or losing structural integrity. One advantage of satin stitches is the flexibility of adjusting stitch angles, which can add dimension and prevent gaps in curves. However, digitizers must balance density and width carefully, as heavy satin stitching can make the fabric stiff or distort the design.
Fill Stitches (Tatami Stitches)
Fill stitches are used to cover large areas with consistent texture. They are made from rows of stitches layered at alternating angles, which distributes thread evenly and prevents fabric distortion. Fill stitches are commonly seen in logos, backgrounds, and bold design elements. They offer versatility because digitizers can adjust stitch density, length, and angle to achieve different visual effects. For instance, low-density fill stitches can give a lighter, more breathable look, while high-density fills provide full coverage and durability. In addition, fill stitches can incorporate creative patterns such as spirals, waves, or zigzags to make designs more dynamic.
Other Specialized Stitch Types in Embroidery
Beyond the three main stitch types, digitizers often use specialized stitches to enhance creativity and durability. Bean stitches, for example, are thicker variations of run stitches that pass over the same line multiple times, creating bold outlines perfect for cartoon-style designs. Zigzag stitches are flexible and commonly used in appliqué, securing fabric pieces neatly while adding decorative flair. Motif stitches replace standard fills with repeating patterns, such as stars or geometric shapes, turning simple embroidery into a piece of art. Each of these specialized stitches gives digitizers more options to adapt designs to fabric types, customer preferences, and creative goals.
Why Choosing the Right Stitch Type Matters
Every stitch type has strengths and limitations, and the success of an embroidery design depends on selecting the right one for each part of the artwork. Using satin stitches where fill stitches are required can lead to looping threads. Using run stitches where satin is better may make text unreadable. The stitch choice impacts durability, aesthetics, and production efficiency. High-quality embroidery is not just about how it looks immediately after stitching but how well it holds up through wear, washing, and time. A skilled digitizer understands how to balance stitch density, direction, and type to minimize fabric stress, reduce thread breaks, and maximize machine efficiency.
Practical Applications of Stitch Types
Run stitches often act as the skeleton of a design, satin stitches bring shine and boldness, while fill stitches give body and stability. For example, in a company logo, the outline might be digitized using run stitches, the lettering might use satin stitches for readability, and the background shape might be completed with fill stitches for coverage. In another scenario, a decorative appliqué could be secured with zigzag stitches while bean stitches highlight bold contours. This layering and mixing of stitch types is what makes embroidery rich, durable, and professional.
Conclusion
Embroidery digitizing is as much about technical knowledge as it is about creativity, and understanding stitch types is central to mastering the craft. Run stitches bring precision and detail, satin stitches add shine and elegance, and fill stitches provide durability and coverage. Specialized stitches like bean, zigzag, and motif expand the design possibilities even further. When a digitizer learns how to use each stitch type correctly, embroidery designs become stronger, more attractive, and more professional. By mastering the language of stitches, you gain control over the final outcome, ensuring that every piece of embroidery reflects both artistry and quality craftsmanship.
FAQs About Stitch Types in Embroidery Digitizing
Q1: Can I use satin stitches for very large areas?
Satin stitches should not be used for wide areas, as they lose strength and can easily snag. Fill stitches are more suitable for covering large sections.
Q2: What stitch is best for small fonts in embroidery?
Run stitches work best for very small text, while satin stitches are ideal for medium-sized fonts. For oversized lettering, fill stitches maintain readability without distortion.
Q3: How do I prevent puckering in embroidery designs?
To prevent puckering, use the correct stabilizer, adjust underlay stitching, and avoid making stitches too dense for the fabric type. Proper pathing and fabric tension also play a role.
Q4: Can stitch types be combined in a single embroidery design?
Yes. In fact, combining stitch types is the hallmark of advanced digitizing. Using multiple stitch styles creates visual depth, durability, and unique textures.
Q5: What is the main difference between fill stitches and motif stitches?
Fill stitches create smooth coverage with alternating rows, while motif stitches create decorative repeating patterns. Motif stitches are more artistic and less uniform than fills.
Tags : .....